This article was peer reviewed by Tim Severien. Thanks to all of SitePoint's peer reviewers for making SitePoint content the best it can be!
Every day, thousands of JavaScript developers use versions of the language that browser vendors haven't even implemented yet. Many of them use language features that are nothing more than proposals, with no guarantee they'll ever make it into the specification. All of this is made possible by the Babel project.
[author_more]
Babel is best known for being able to translate ES6 code into ES5 code that we can run safely today, however it also allows developers to write plugins that transform the structure of JavaScript programs at compile time.
Today, we'll look at how we can write a Babel plugin to add immutable data by default to JavaScript. The code for this tutorial can be downloaded from our GitHub repo.
Language Overview
We want to design a plugin that will allow us to use regular object and array literals, which will be transformed into persistent data structures using Mori.
We want to write code like this:
var foo = { a: 1 };
var baz = foo.a = 2;
foo.a === 1;
baz.a === 2;
And transform it into code like this:
var foo = mori.hashMap('a', 1);
var baz = mori.assoc(foo, 'a', 2);
mori.get(foo, 'a') === 1;
mori.get(baz, 'a') === 2;
Let's get started with MoriScript!
Babel Overview
If we look beneath the surface of Babel, we'll find three important tools that handle the majority of the process.

Parse
Babylon is the parser and it understands how to take a string of JavaScript code and turn it into a computer friendly representation called an Abstract Syntax Tree (AST).
Transform
The babel-traverse module allows you to explore, analyse and potentially modify the AST.
Generate
Finally, the babel-generator module is used to turn the transformed AST back into regular code.
What is an AST?
It's fundamental that we understand the purpose of an AST before continuing with this tutorial. So let's dive in to see what they are and why we need them.
JavaScript programs are generally made up of a sequence of characters, each with some visual meaning for our human brains. This works really well for us, as it allows us to use matching characters ([], {}, ()), pairs of characters ('', "") and indentation to make our programs easier for us to interpret.
However, this isn't very helpful for computers. For them, each of these characters is just a numeric value in memory and they can't use them to ask high level questions like "How many variables are there in this declaration?". Instead we need to compromise and find a way to turn our code into something that we can program and computers can understand.
Have a look at the following code.
var a = 3;
a + 5
When we generate an AST for this program, we end up with a structure that looks like this:
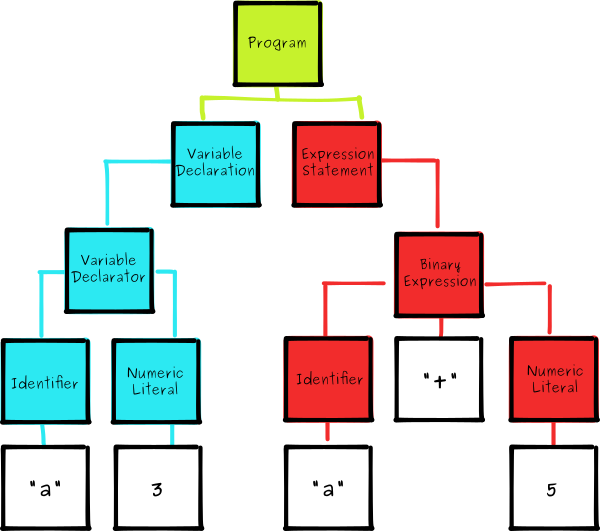
All ASTs start with a Program node at the root of the tree, which contains all of the top level statements in our program. In this case, we only have two:
- A
VariableDeclarationwith oneVariableDeclaratorthat assigns theIdentifier"a" to theNumericLiteral"3". - An
ExpressionStatementwhich is in turn is made up of aBinaryExpression, which is described as anIdentifier"a", an operator "+" and anotherNumericLiteral"5".
Despite the fact that they are made up of simple building blocks, the size of ASTs means they are often quite complex, especially for nontrivial programs. Rather than trying to figure out ASTs ourselves, we can use astexplorer.net, which allows us to input JavaScript on the left, then outputs an explorable representation of the AST on the right. We'll use this tool exclusively to understand and experiment with code as we continue.
To stay consistent with Babel, make sure you choose "babylon6" as a parser.
When writing a Babel plugin, it's our job to take an AST then insert/move/replace/delete some nodes to create a new AST which can be used to generate code.
Setup
Make sure you have node and npm installed before you start. Then create a folder for the project, create a package.json file and install the following dev dependencies.
mkdir moriscript && cd moriscript
npm init -y
npm install --save-dev babel-core
Then we'll create a file for our plugin and inside we'll export a default function.
// moriscript.js
module.exports = function(babel) {
  var t = babel.types;
  return {
    visitor: {

    }
  };
};
This function exposes an interface for the visitor pattern, which we'll come back to later.
Finally we'll create an runner that we can use to test our plugin as we go.
// run.js
var fs = require('fs');
var babel = require('babel-core');
var moriscript = require('./moriscript');

// read the filename from the command line arguments
var fileName = process.argv[2];

// read the code from this file
fs.readFile(fileName, function(err, data) {
  if(err) throw err;

  // convert from a buffer to a string
  var src = data.toString();

  // use our plugin to transform the source
  var out = babel.transform(src, {
    plugins: [moriscript]
  });

  // print the generated code to screen
  console.log(out.code);
});
We can call this script with the name of an example MoriScript file to check that it generates the JavaScript we are expecting. For example, node run.js example.ms.
Arrays
The first and foremost goal for MoriScript is to convert Object and Array literals into their Mori counterparts: HashMaps and Vectors. We'll tackle arrays first, as they're slightly simpler.
var bar = [1, 2, 3];
// should become
var bar = mori.vector(1, 2, 3);
Paste the code from above into astexplorer and highlight the array literal [1, 2, 3] to see the corresponding AST nodes.
For the sake of readability, we'll omit the metadata fields that we don't need to worry about.
{
  "type": "ArrayExpression",
  "elements": [
    {
      "type": "NumericLiteral",
      "value": 1
    },
    {
      "type": "NumericLiteral",
      "value": 2
    },
    {
      "type": "NumericLiteral",
      "value": 3
    }
  ]
}
Now let's do the same with the call to mori.vector(1, 2, 3).
{
  "type": "CallExpression",
  "callee": {
    "type": "MemberExpression",
    "object": {
      "type": "Identifier",
      "name": "mori"
    },
    "property": {
      "type": "Identifier",
      "name": "vector"
    }
  },
  "arguments": [
    {
      "type": "NumericLiteral",
      "value": 1
    },
    {
      "type": "NumericLiteral",
      "value": 2
    },
    {
      "type": "NumericLiteral",
      "value": 3
    }
  ]
}
If we express this visually, we'll get a better sense of what needs to change between the two trees.
Continue reading %Understanding ASTs by Building Your Own Babel Plugin%


